Include a numeric variable in a Gnuplot title or legend
I was fitting a function to some data using Gnuplot, and then I wanted to include the result of the fit in the legend of my plot. Well, up to here the script looks like the following:
# my function to fit the data
f(x) = A*x**B
# initial values for the fit
A = 1
B = 1
# do the fit, use column 2 as x and the absolute value of column 5 as y
fit f(x) "data.csv" using 2:(abs($5)) via A, B[... lots of output from fit ...]
Now the variables A and B have a new value, resulting from the fit:
print A, B46.437770413374 0.153260265112221
I can plot the data together with the fit:
set output "data.png"
set terminal png
set logscale xy
set samples 10000
plot f(x), "data.csv" using 2:(abs($5))
This generates the following image:
Now I would like to have a legend for the fit like the following:
"y=A*x**B, A=46.437; B=0.153"
After digging a bit in the documentation, I discovered that Gnuplot has an sprintf function that can be used more or less everywhere where a string literal would work. So that's how I got what I wanted:
[...]
plot f(x) title sprintf("y=A*x**B, A=%.3f; B=%.3f", A, B) ,\
"data.csv" using 2:(abs($5))
And that's what it looks like:
Well, in the next steps the legend could be moved to the lower right corner, but I'll leave that as an exercise for the reader ;-)
How I take photos (Part 1)
The key point is maybe ambition — I want to take pictures that are interesting: They should tell an interesting story, freeze an interesting moment or show an interesting perspective. Maybe 0.1 percent of the pictures I take truly accomplish that, and so throwing away lots of pictures is one cornerstone of my photographic strategy. Honestly, I delete easily 80 % to 90 % of my photos because they have technical flaws or are just boring. That's like goldpanning: 1 g of pure gold is more valuable than 1 g of gold mixed with 11 kg of gravel.
Where I take photos
I never created pictures "from scratch" so far. I don't set up light, scenery, people etc. exactly like I imagine, but I start from a "real" situation. That's something I really enjoy: To go out in the fields and catch interesting stuff with the camera.
Some people, as I heard, would take a macro photo of a bumblebee by catching one, putting it in the fridge, cutting a flower in the garden and setting up the dazed bumblebee on the cut flower inside their photo studio. I mean, the picture certainly gets good because the photographer can use all kinds of equipment and has full control over light and background. But I don't like the fact that the picture would be an illusion. Instead I prefer to go out in the field and run after bumblebees to show what they are actually doing — how they hover in front of flowers or how they dip their tongue in the nectar, for instance.
That means I rarely take pictures at home: Maybe when there's a party or when a cellar spider is having babies. Otherwise I find my subjects outside and my photo trips are more like hiking tours with prologed photo breaks. That is reflected in my...
...Equipment.
The most expensive and powerful camera is pretty useless if it's inside its bag at home because it's too heavy to carry around. On a hiking trip or for small recreational tours I find an SLR camera too bulky, so I prefer a compact camera. An SLR I only carry if I already plan to take lots of pictures. From my experience you can take good pictures with every camera (and bad pictures also). Different cameras just offer different technical possibilities and allow you to take different kinds of pictures. One of my personal favourites was actally taken with a cell phone camera: An invaluable documentation of my activities in Finland.
Taking a dip in an ice hole (Nasijärvi, near Tampere)
After Sauna it's OK...
My current compact camera is a cheap and crappy one I got as a gift four or five years ago. It still takes acceptable pictures, at least as long as you don't zoom in too much. When it finally drops into a bottomless chasm or something like that I will only feel sad for the pictures on the memory chip!
Tau auf Gras
Taken with my compact camera. Every camera with a macro function can take such pictures!
If I could choose a compact camera today, I'd get one with 6 to 10 MPix sensor, short "boot time", fast autofocus, low trigger delay, a big, bright display, long battery life, 3x zoom lens with macro and really slim case. Maybe it could also be waterproof to a depth of 3 m.
SLR cameras
I love them! But with the cheap lenses the manufacturers sell together with them they're just expensive, bulky compact cameras with lots of useless extra buttons and functions. Those lenses have small numerical aperture, meaning they don't let much light through, and the one that came with my parent's Pentax K10D even makes blurry pictures because of extreme lens errors.
For me SLR cameras only make sense if you have at least two or three different high-quality lenses. With my parent's K10D I often use decades-old fully mechanical lenses with fixed focal length. They don't have autofocus or automatic aperture adjustment, but due to their simple optical design they have almost no noticeable lens errors together with an incredible aperture. Thanks to Pentax' strong dedication to backwards compatibility they work just fine with the K10D. The only autofocus lens I use is a 100 mm, f=2,8 macro lens. Autofocus and automatic exposure adjustment are pretty useful if you are hunting fast small animals!
One of my favourite subjects is macro photography, and there a SLR camera allows you to set the focus exactly where you want. The focussing screen still gives a much better picture than displays which is really important because the depth of focus might be less than a millimeter.
Eidechse
Eidechse im Dosenmoor.
Subjects
I like to take pictures of people, flowers, animals and landscapes. To me it seems that it is much easier to take interesting pictures of people, animals and flowers than interesting pictures of landscapes. Having people somewhere in the landscape often helps. A dramatic sunset, a sky full of clouds and the soft, warm light of the morning and evening hours can make landscapes more photogenic.
Panoramas
Even with a wide-angle lens the landscape often just doesn't fit on the picture. Think for example of the view from a high mountain, with even higher peaks in the background and a deep valley in front of you, spanning 180° horizontally and more than 90° vertically. With a standard wide-angle lens I could just get a snippet which often cannot show the full beauty of the view. But with suitable software that is freely available,like "hugin", you can "stitch" several pictures together, resulting in one big picture. Even 360°-views are possible.
Panorama vom Gipfel des Schilthorns
Schweizer Alpen
For such large pictures I find computer screens too small. You either don't see any details, or you have to scroll like crazy. Big prints from large-format color printers might be a solution and I'd like to experiment with that a bit in the future.
The software hugin is worth a blog entry by itself. Bad news: You need a camera that can take several pictures with the same exposure settings (I use an SLR camera), and for real good panos you need a tripod. But the results are impressing and I usually get positive feedback on the pictures.
Animals
I try to always get the head and especially the eyes on a picture. If you look at a person or an animal, your first look goes there, and if you can't see head or eyes, something seems to be missing. That is especially important for macro photography where you often can't get everything in focus. If the eyes are blurry, the whole thing seems to be out of focus.
Marienkäfer-Larve auf einer Margeritenblüte
If your subject is looking directly at the camera you can get even more tension.
Blaumeise
Von Angesicht zu Angesicht
People
When people see a camera pointed at them, few react all naturally. Some try to get away and hide, some others pose and smile from one ear to the other, and a few make faces. All three can result in interesting pictures, but sometimes you want to get people looking "naturally". I use several approaches:
Sneak up to them while they are distracted
Use lenses with long focal length
Pretend to be fiddling with the camera and catch them off-guard
Take several pictures in short intervals because they often relax after the first picture and can't keep their posure for longer time
For portraits I prefer to use a lens with 50 or 100 mm focal length because otherwise the face looks distorted. A wide aperture can make the skin look smoother and helps to separate the face from the background. Also here I always focus on the eyes, and the nose and mouth should be in focus, too.
In groups of people the probability P of one blinking or making a stupid face in the moment you push the shutter release grows exponentially with the number of people follows a law of the form P = 1 - pn, with p < 1 being the probability of one person to look good and n being the number of persons.
The only solution to that equation I found until now is to take LOTS of pictures. LOTS means at least 20. I find it quite difficult to keep people entertained, many react a bit irritated if you you let them pose again and again for 30 minutes. Unfortunately people generally don't like pictures of grim or bored-looking people, so I keep talking and waving to get people laughing and looking at me. As long as people listen to me, they shut up! People talking to each other is fatal because most people look REALLY stupid when they have their mouth open.
Flowers
I think of a flower as the face of a plant. That means, if I take plant pictures a flower in focus should dominate the picture. The stigma and stamen are the "eyes", so they should always be in focus, at least partially. With compact cameras that is rarely an issue because of their huge depth of focus. With SLR camera, macro lens and big aperture because of dim light it is however extremely important. I try to place the focal plane in such a way that main features (some petals, stamen, stigma, some leaf) are in focus and provide an outline of the flower's shape.
Tillandsia bergeri Blüten-Detail
Low depth of focus: Concentration on the flower.
Although I find it more difficult to place the focal plane, pictures with low depth of focus help to concentrate the perspective on the flower. With bigger depth of focus I get lots of disturbing background features on the photo, while at low depth of focus the background is just blurry and the flower hovers in front of it.
Osterglocken
High depth of focus: Junk in the background
Processing
For a long time, especially while I took pictures on film and not digitally, I didn't alter anything but took the pictures how the processing service made them. Now with digital photography I sometimes like to readjust the exposure , black, grey and white levels and color balance. With JPEGs that's not so much fun because they have a low dynamic range. Underexposed parts usually fade to black and overexposed parts are just white. Additionally I lose quality because of repeated JPEG compression.
With camera raw data it's much more fun to play! I use the Open Source software UFRaw. With this software I can control in every way I want how the brightness information from the sensor pixels is mapped onto the 24 bit color space of conventional image files. You can do pretty crazy stuff with that:
Riesenrad
For comparison: This is the original picture.
Riesenrad
But it is also useful just to balance colors and contrast in different parts of the histogram: In the next picture I pulled the background from light grey to white and I strongly enhanced the light bluish color of the tit feather as well as the contrast.
Meisenfeder
Farben verstärkt mit ufraw
Presentation
I hate when people show me hundreds of pictures that essentially depict the same! So I like to select only the best and most interesting of my shots and show only a few at a time — at least as long as I can hold myself! To manage my pictures I like software where I can rapidly switch between pictures, delete bad pictures with one keystroke and otherwise arrange things how I like to. I don't like big hierachical folders because it's a pain to find stuff if you deal with 1000 files or more, but I prefer a flat, tagging-like approach.
For online presentation I use a home-brew PHP software where people can browse online through the ordered, named and categorized pictures and where I can upload and arrange pictures. For some time I kept all my pictures there but recently I deal with high-resolution raw camera data, and that's in several ways not compatible with that software. The long delays when the software loads a picure or applies changes increasingly get on my nerves, so I think I'll have to look for something new or write it myself. Let's see...
To be continued...
In the next part I'd like to write about special situations like night shots, photography with a microscope and stuff like that.
HOWTO: Epson Perfection V200 Photo with Linux
This howto describes the steps necessary to use the Epson Perfection V200 Photo scanner with Debian Testing (lenny) as of October 2007. The used kernel versions are 2.6.18 and 2.6.22. Other Epson scanners should work in a similar way, see list of supported devices. The scanner is perfectly supported, 8 bit and 16 bit color depth as well as the transparency unit work. This howto will probably also work with Ubuntu, but that's not tested.
Needed Debian packages
sane-utils
sane and/or xsane
alien (tool to convert .rpm packages to .deb)
Download and install drivers
The drivers are available on the Japanese vendor's site. Choose your scanner and your distribution, fill out the small questionnaire and submit the form. You are directed to a download page. There get the RPM packages for "gcc 3.4 or later".
Now you need to convert the packages to the .deb format in order to install them:
Now plug in and switch on the scanner. lsusb must show the scanner.
uellue@yggdrasil:~$ lsusb
[...]
Bus 005 Device 002: ID 04b8:012e Seiko Epson Corp.
[...]
With sane-find-scanner you can check whether Sane finds the device. With scanimage -L you can find out if the driver is properly installed. For now only root has access to the scanner.
uellue@yggdrasil:~$ sudo sane-find-scanner
# sane-find-scanner will now attempt to detect your scanner. If the
# result is different from what you expected, first make sure your
# scanner is powered up and properly connected to your computer.
[...]
found USB scanner (vendor=0x04b8 [EPSON], product=0x012e [EPSON Scanner]) at libusb:005:002
# Your USB scanner was (probably) detected. It may or may not be supported by
# SANE. Try scanimage -L and read the backend's manpage.
[...]
uellue@yggdrasil:~$ sudo scanimage -L
device `epkowa:libusb:005:002' is a Epson Perfection V200 flatbed scanner
To allow ordinary users to access the scanner, they must be member of the scanner group. You also need to restart the udev daemon.
uellue@yggdrasil:~$ sudo adduser uellue scanner
Adding user `uellue' to group `scanner' ...
Adding user uellue to group scanner
Done.
uellue@yggdrasil:~$ sudo /etc/init.d/udev restart
Stopping the hotplug events dispatcher: udevd.
Starting the hotplug events dispatcher: udevd
After logging out and logging in again to make the altered group membership effective scanimage -L should show the scanner for all members of the group scanner. Now you can use the device for example with xscanimage or xsane.
German politicians asked by children about the internet (German)
To speed up Debian online updates of several computers in my network and to lighten the load on the Debian mirrors I use a caching proxy server.
There are several small programs written explicitely for caching or mirroring Debian-style archives. My first attempt was Approx.
Approx acts from the outside like an apt mirror and loads packages on request from other apt mirrors specified in it's configuration file. If the requested file is already in the cache the data are directly served from disk. On the clients the Approx server must be added in the sources.list file.
Approx worked more or less for a single client, but as soon as parallel updates on several machines requested the same file the Approx server ran into locking problems. Result was that the updates stopped because the server returned garbage.
Even for single clients it gave errors because of package signatures that didn't match the signing keys. Only deleting the cached package lists and keys in the cache and this way enforcing a reload solved the problem.
Apt-proxy was too difficult to configure for my taste, so I didn't really try it, and Apt-cacher ran after a short test into the same locking problems as Approx.
In a forum I heard people recommend Http-replicator for caching Debian archives. Http-replicator acts as HTTP proxy and mirrors the file hierachy of the accessed servers in it's cache.
This program is not included in Debian, but a .deb package is available. Installing and configuring it was not much of a problem, and this program could handle parallel access better.
On the client side the normal Debian archive servers were added to the /etc/apt/sources.list file and the caching server was added as HTTP proxy to the client configuration. To make Apt use a HTTP proxy a file containing the line Acquire::http::Proxy "http://aptproxy:9999/"; must be added to /etc/apt/apt.conf.d/
Unfortunately it was not possible to restrict the access to Debain archive mirrors. Http-replicator would cache the whole internet and also grant access to local services on the machine that is running Http-replicator.
The solution was to use Squid. In the default configuration it is not so well-suited for caching Debian archives with their often somewhat larger files, but it can be configured to act quite smoothely. It was even possible to restrict access from the "outside", i.e. untrusted networks, to Debian archives and allow unlimited access to machines in the local VPN.
Here the relevant lines of /etc/squid/squid.conf:
# 3128 is the squid default port. It's only open from "inside"
http_port 10.10.1.1:3128
http_port 127.0.0.1:3128
# aptproxy at port 9999 is public
http_port 9999
# Also cache large files, otherwise it wouldn't be so useful as apt cache
maximum_object_size 100 MB
# This optimizes byte hit rate
cache_replacement_policy heap LFUDA
# Give it 10 GB space :-)
cache_dir ufs /var/spool/squid 10000 16 256
# Access control
acl all src 0.0.0.0/0.0.0.0
acl localhost src 127.0.0.1/255.255.255.255
acl to_localhost dst 127.0.0.0/8
# 10.10.1.1 is the "inside" IP of the server
acl vpn_access myip 10.10.1.1
# "outside" network and "inside" network
acl our_networks src 192.168.0.0/24 10.10.1.0/24
# All the official debian mirrors are below that domain
# Other allowed sources can be added here
acl debian_cache dstdomain .debian.org
# Allow everything from the inside
http_access allow vpn_access
http_access allow localhost
# only VPN and localhost can query the local web server
http_access deny to_localhost
# allow to acces the debian archives
http_access allow debian_cache our_networks
# here proxying for the "outside" can be turned on. Don't forget to open the port!
# http_access allow our_networks
# And finally deny all other access to this proxy
http_access deny all
Squid can handle concurring access to the same file without problems, didn't cause signature problems so far and uses less CPU time than the other solutions. The hit rate is quite well for parallel updates. It is not a good solution if you want to create a local Debian mirror that keeps files infinitely.
Squid should work with any distribution that updates via HTTP if you grant access to the appropriate domains, not only Debian or APT-based distributions. For existing Squid installations only the maximum object size and maybe the disk space need to be large enough.
On the client side you have to configure your package management or update system to use the proxy—that's all.
HOWTO: Configure WLAN client for EAP-TLS with Linux
This howto describes specificly the WLAN configuration in the Technical Faculty of the Christian Albrechts University in Kiel (TF), but is hopefully also useful for other users who want to configure an EAP-TLS WLAN client with xsupplicant under Linux.
user@host:~$/sbin/iwconfig
lo no wireless extensions.
eth0 no wireless extensions.
eth2 IEEE 802.11g ESSID:"TFconnect"
Mode:Managed Frequency:2.412 GHz Access Point: 00:A0:C5:5C:CC:4D
Bit Rate:54 Mb/s Tx-Power:15 dBm
Retry limit:15 RTS thr:off Fragment thr:off
Power Management:off
Link Quality=82/100 Signal level=-52 dBm Noise level=-53 dBm
Rx invalid nwid:0 Rx invalid crypt:2 Rx invalid frag:0
Tx excessive retries:0 Invalid misc:459 Missed beacon:0
sit0 no wireless extensions.
Here eth2 is recognized as wireless interface.
Now you can start Kismet and see if you are receiving stuff. In the TF a network with ESSID "TFconnect" must appear.
Get and convert the cryptographic keys
In the TF you first need to get a personal account; ask the network administrators.
They will generate an user key and an user certificate and include both in an pkcs12 encoded file. Furthermore you'll get the self-signed certificates for their Certificate Authority (CA) and two subsequent certificates as DER-encoded files. These certificates are used for signing their keys.
Xsupplicant needs the keys in PEM format, so you'll have to use OpenSSL to convert them.
Convert the DER certificates Client.der, Server.der and Root.der to PEM:
openssl x509 -inform DER -in Client.der -out Client.pem
openssl x509 -inform DER -in Root.der -out Root.pem
openssl x509 -inform DER -in Server.der -out Server.pem
Then you should move the .der files somewhere else so that they don't lead to confusion.
Convert the pkcs12 file xyz.p12 to PEM format (in the TF xyz is your account name):
OpenSSL will ask you for the import passwort of the pkcs12 file (empty in the TF) and for a passphrase for the private key in the PEM file. The PEM file now contains your user certificate and your private key. Keep this private key secret, i.e. make sure nobody you don't trust can read it.
Configure Xsupplicant
In Debian the configuration file is at /etc/xsupplicant/xsupplicant.conf. After installation there's a sample configuration that explains the configuration options. Move this file somewhere else so that it's not overwritten, e.g. /ect/xsupplicant/xsupplicant.conf.old
Configuration for the TF based on the sample configuration:
# network_list: defines all of the networks in this file which
# should be kept in memory and used.Comma delimited list or "all"
# for keeping all defined configurations in memory. For efficiency,
# keep only the networks you might roam to in memory.
# To avoid errors, make sure your default network is always
# in the network_list. In general, you will want to leave this set to
# "all".
network_list = all
#network_list = default, test1, test2
# default_netname: some users may actually have a network named "default".
# since "default" is a keyword in the network section below, you can
# change which is to be used as the replacement for this keyword
#
# As of Xsupplicant 1.2.2, wireless interfaces will no longer use the default
# network name if they are unable to find a valid config. If you have
# auto association turned on, Xsupplicant will find a new network to connect
# to. Otherwise, it will do nothing.
default_netname = default
# When running in daemon, or non-foreground mode, you may want to have the
# output of the program. So, define a log file here. Each time XSupplicant
# is started, this file will be replaced. So, there is no need to roll the
# log file. If the logfile name is set to "syslog", then all messages will
# be sent to the syslog. If syslog is defined, you should also define
# "log_facility" to specify which logging facility will be used.
logfile = syslog
# If you have set the logfile option to "syslog", then you should define
# log_facility in order to tell Xsupplicant where to send log messages.
# Valid settings are cron, daemon, ftp, kern, local0, local1, local2,
# local3, local4, local5, local6, local7, lpr, news, user, and uucp
log_facility = daemon
# The "default_interface" is the interface that will be used if one is not
# specified on the command line.
#default_interface = eth1
# We know the interface from the iwconfig output
default_interface = eth2
## Default Network Section
# This is the network configuration that will be used in the event that
# no valid network configuration can be found. If you are going to leave
# Xsupplicant running all the time, it is recommended that you leave this
# section blank. A blank network definition will result in Xsupplicant
# turning off encryption and turning control over to iwconfig.
default
{
}
# The network's ESSID, in case of the TF it's TFconnect
TFconnect
{
# allow_types: describes which EAP types this network will allow. The
# first type listed will be requested if the server tries to use something
# not in this list.
# allow_types = eap_tls, eap_md5, eap_gtc, eap-otp
allow_types = all
# identity: what to respond with when presented with an EAP Id Request
# Typically, this is the username for this network. If this is a string
# that does not contain any spaces, or unusual characters, it can be listed
# plain. Otherwise, it should be enclosed in quotes.
# your account name
identity = xyz
## method-specific parameters are kept in the method
eap_tls {
# Certificate and key are contained in the same file here
user_cert = /path/to/user/cert/xyz.pem
user_key = /path/to/user/cert/xyz.pem
# What you entered as passphrase when you converted the pkcs12 file
user_key_pass = "secret"
root_cert = /path/to/certificates/Root.pem
# Directory containing Client.pem, Server.pem and Root.pem
root_dir = /path/to/certificates/
#crl_dir = /path/to/dir/with/crl
chunk_size = 1398
# /dev/random is more secure, but too slow
random_file = /dev/urandom
# To enable TLS session resumption, you need to set the following
# value to "yes". By default, session resumption is disabled.
#session_resume = yes
}
}
See the Xsupplicant documentation and the sample configuration file for other options.
Test the configuration
First we have to join the TFconnect network:
host:~# iwconfig eth2 essid "TFconnect"
Now start Xsupplicant as root on the command line on interface eth2 (-i eth2) using our configuration file (-c /etc/xsupplicant/xsupplicant.conf) in the foreground (-f) with verbose debugging (-d A) to test the configuration file. This will produce a lot of text, you might want to redirect it to a file to analyze it in case something goes wrong.
The connection is only established completely at the moment the interface is "up". It takes some time (like, 30 s) until the connection is finally established. We open another shell to activate the network interface eth2 and to configure it.
host:~# xsupplicant -c /etc/xsupplicant/xsupplicant.conf -i eth2 -f -d A
[STATE] Reinit state machine
[STATE] [backend_sm] REQUEST -> INITIALIZE
[STATE] [backend_sm] INITIALIZE -> IDLE
[STATE] [backend_sm] UNKNOWN -> INITIALIZE
[STATE] [backend_sm] INITIALIZE -> IDLE
[INT] Initializing socket for interface eth2..
[INT] Allmulti mode is already enabled on this device!
[INT] Interface eth2 is wireless!
Card reported capabilitites : WEP40 WEP104 WPA WPA2 TKIP CCMP
[INT] Interface initialized!
[CONFIG] Working from config file /etc/xsupplicant/xsupplicant.conf.
No configuration information for network "(null)" found. Using default.
[INT] Opened socket descriptor #5
[INT] Interface eth2 is wireless!
Your card is currently set for wireless network "TFconnect". Looking for a config.
[CONFIG] Working from config file /etc/xsupplicant/xsupplicant.conf.
[STATE] Init wireless state machine.
UNASSOCIATED -> ACTIVE_SCAN
[STATE] Reinit state machine
[STATE] [backend_sm] IDLE -> INITIALIZE
[STATE] [backend_sm] INITIALIZE -> IDLE
Scanning for wireless networks ...
[...]
[ALL] Clock tick! authWhile=0 heldWhile=0 startWhen=0 curState=AUTHENTICATED
[ALL] Clock tick! authWhile=0 heldWhile=0 startWhen=0 curState=AUTHENTICATED
[ALL] Clock tick! authWhile=0 heldWhile=0 startWhen=0 curState=AUTHENTICATED
[ALL] Clock tick! authWhile=0 heldWhile=0 startWhen=0 curState=AUTHENTICATED
[...]
If there's no error you'll finally get this output from xsupplicant.
On another shell we activate the interface and try to get a network configuration via DHCP:
host:~# ifconfig eth2 up
host:~# dhclient eth2
Internet Systems Consortium DHCP Client V3.0.4
Copyright 2004-2006 Internet Systems Consortium.
All rights reserved.
For info, please visit http://www.isc.org/sw/dhcp/
Listening on LPF/eth2/00:11:22:33:aa:bb
Sending on LPF/eth2/00:11:22:33:aa:bb
Sending on Socket/fallback
DHCPREQUEST on eth2 to 255.255.255.255 port 67
DHCPACK from 192.168.0.1
bound to 192.168.0.150 -- renewal in 18844 seconds.
If everything goes right we get an IP address. If there's no DHCP server running in your network you have to set IP address, netmask, routing information, DNS servers etc. by hand.
Automating stuff
This section is still incomplete, I so far only figured out how to control Xsupplicant with the init script /etc/init.d/xsupplicant. On Debian you have to edit /etc/default/xsupplicant and to set ENABLED=1 and to give suitable arguments, like ARGS="-i eth2 -c /etc/xsupplicant/xsupplicant.conf". I am still working on a way to configure the interface via /etc/network/interfaces or even to join the right network automatically.
US nuclear bomb test site
A place with hundreds of craters from nuclear bomb tests of various strength:
37.177 -116.0462. The coordinates point to a large crater which was created by the test explosion Sedan (Video) in 1962. If you open these coordinates in Google Earth and activate the layer "Google Earth Community" you can inform yourself about the names and strengths of the various test explosions.
In the so-called "Operation Plowshare" the US gouvernment wanted to explore possible applications of nuclear explosive devices for mining and large excavations. The until then not so well-known "side effects" of nuclear explosions doomed those plans and finally led to the Partial Test Ban Treaty.
The iBook is broken, the remaining parts are for sale. [Update]
The worst has happened ─ my iBook G4 12'' is dead. Shortly after changing the hard disk
the display went black and the computer started to smell like overheated electronics. Opening it again revealed that I accidentally squeezed a cable that leads to the display while I reassembled the iBook, which caused a short circuit that finally roasted the graphics module.
Now I decided to sell the broken iBook as a whole or as parts, they might be useful for someone who wants to repair or upgrade his iBook. As the iBook doesn't boot anymore I cannot guarantee for the parts.
All prices are negotiable.
Parts from an iBook G4 12'' (bought January 2005).
Part
Specification
Description and comments
Proposed price
Hard disk
Samsung 60 GB, 5400 rpm, 8 MB cache, PATA
Not original, but replacement part, almost new and tested (blanked with zeros)
45 € (New: 59 €)
Keyboard
German layout
A bit dirty after 2 years of use, but worked perfectly until now.
20 €
Battery
model A1061
Original battery was recalled by Apple, this one is around 1,5 years old, remaining capacity unknown, but not noticeable reduced. Only minor wear on the surface.
25 €
OS X 10.3 + iLife '06
All software and paper shipped with this mac.
CDs, DVDs, handbooks etc.
15 €
Power plug.
The part where you plug in the output of the mains adapter and that leads the power to the mainboard.
This might break if you trip over the cable.
10 €
Already sold:
Part
Specification
Description and comments
Proposed price
Airport Extreme card
WLAN for iBooks
Easy to upgrade in iBooks.
15 €
ComboDrive
Reads DVDs, can burn CDs
Shouldn't be affected as the HD is working.
20 €
512 MB DDR-RAM
For notebooks, noname, 400 MHz CL 3 PC3200S-30440
Bought separately and used to upgrade.
30 €
Bluetooth module
Internal bluetooth module.
I don't know if it's possible to upgrade this part in other iBooks.
5 €
Mains adapter
A bit dirty and scratches on the plastic, but fully functional.
15 €
Remaining "carcass"
Display unit (maybe broken!), mainboard (256 MB builtin RAM, graphics module roasted), metal frame, plastic shell, metal shields, all screws, original shipping box
Normal wear (little scratches, a bit of dirt)
20 €
This sums up to 220 €. For all the stuff together I offer a special price of 99 €. Submit offers and questions as comment to this blog entry or mail to uellue dot unterwegs at freenet dot de.
Preferred way of payment and shipment: Cash and carry (i.e. you pay in cash and carry away the parts yourself). If you want to get the parts delivered (within the EU), I charge 5 € per order for packaging and transport and you have to pay in advance (bank details on request). And again: This iBook is broken and doesn't boot anymore, so I can't guarantee for anything except of the hard disk.
iBook surgery
On friday my beloved iBook didn't wake up when I opened it. Instead the hard disk made sounds like rtrtrt...rtrtrt...rtrtrt...rtrtrt... Powercycling didn't help, so I decided to replace the harddisk. This sounds easier than it is, because you have to disassemble an iBook to get to the harddrive buried deep inside the "guts". And iBooks are not made for easy disassembly!
I had some experience with opening an iBook before, and I still remembered how it took a load off my mind when this little cutie booted again.
Anticipating the worst I checked the prices for the new Apple MacBook. Well, if I failed to repair my iBook I had to pay roughly 1400 € for a new one. Certainly too much for my taste!
Atelco in Raisdorf only had a 60 GB notebook drive, so I bought it although it meant downgrading from my 80 GB drive. To make a backup of the old drive I also bought an USB 2.0 to IDE and SATA adapter.
Following this excellent guide I went to the next hardware store and bought a Torx T8 and a Philips #0 screwdriver. At home we have tons and tons of different screwdrivers, but most small ones are ultra-cheap crap. I mean, why do people produce, sell and even buy this stuff? They usually "screw up" on their first or second screw...
These are the tools I used:
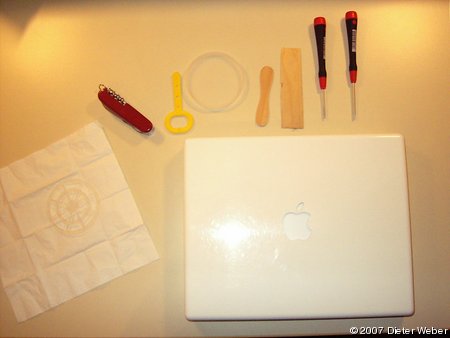
The hardest part is to remove the plastic shell, because you have to release a few notches and you might easily break something. I used the wooden tools you can see on the picture above for that; it worked quite well. On the next picture you can see the almost disassembled iBook:
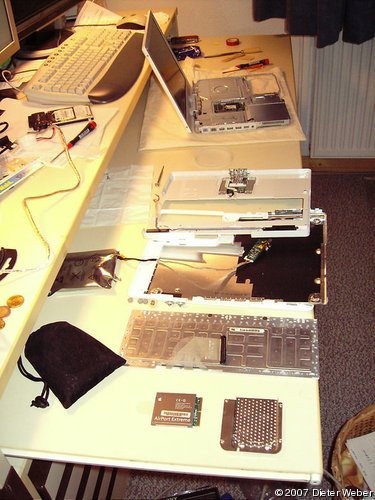
Fortunately I managed to back up the data on the broken hard disk (although there is almost nothing important on it), but the drive is really broken, it paused during backup again and again, making the rtrtrt...rtrtrt noises. The new one works smoothely, I already installed OS X again and decided not to use the backup except of a few precious files like the browser's bookmarks. I had too much old stuff on the iBook anyway. Now I hope that the next time my iBook gets broken I have significantly more money so I can buy such a nice dual-core MacBook or MacBook Pro...